Revised building a raised bed on a slope using 4x4’s


Joined
Jul 26, 2020
Messages
32
Reaction score
12
Location
Mobile Alabama
Hardiness Zone
8b
Country
United States
I originally thought about using concrete blocks and abandoned that idea. So I have my bed 4x8 rectangle and the high side of the slope running 8 feet north to south . The sides are going down the slope with the west end on the low side. The north side has a little slope. About one inch difference from the south side. So I am looking at 8 inch slope 17% vs 9 inch slope 19% going down the slope. I asked a friend in the landscape business how I should go about building it and it . I told him my idea was building the rectangle And digging out the dirt to get it level and adding layers till I was just above the ground on the high side. He said that was one way. My way requires moving a lot of soil and having wood down below on the high side which would cause it to rot quicker. He said as a standard you usually want your 1st layer sunk 2 inches in the ground. So if I understood him correctly, I could place one 4x4x8 on the high side get it level. Secure it and start on the low side until it was level with high side. Than somehow I would stagger my lumber on the sides instead of connecting everything together as in my own idea. I am still trying to conceptualize this.
Does any of this make sense?

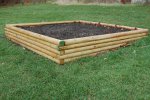
incidentally I purchased 9 4x4x8’s and cut 3 of them in half. that was my idea of having 3 layers
Either way I could always make alterations if need be.
I am a person who does much better with visual aids and I only found one video from Lowe’s building terraced gardens but it’s not the same as my situation and it only shows a small part of it.
Man it would be a piece of cake on level land
 
Ad

Advertisements

Joined
Oct 8, 2017
Messages
6,269
Reaction score
4,726
Location
Birmingham, AL USA
Hardiness Zone
8a
Country
United States
Like this?
IMG_0854.jpg
 
Joined
Jul 26, 2020
Messages
32
Reaction score
12
Location
Mobile Alabama
Hardiness Zone
8b
Country
United States
I am building a single bed for vegetables, and I won't be using 2x as in this picture. I am going to use 4x4 lumber. Building my bed 4x8..
I also don't intend on building my high side up like this pic. I was thinking just a couple of inches above ground on the high side.
Of course the low side will have to be built up to get it level.. The ground that I am building up on is not hard at all.
 
Joined
Jul 3, 2020
Messages
292
Reaction score
170
Location
Western Michigan
Hardiness Zone
6B
Country
United States
I got a feeling that I will figure it out as I go.

Yup. Even on level ground every garden bed is built a little different.

So you're planning on stacking the 4x4s to make your height. How are you fastening them together? I have done this three different ways (1) use a heavy duty screw gun and shoot in lag bolts (new construction screws like SPAX or GRK are the same idea), (2) stack the 4x4 then drill through the stack with a 1/2" bit and pound in rebar - this also will allow you to anchor it deeper into the ground, (3) stack the 4x4 then drill through the stack with a 1" or so bit and pound in wooden broom sticks.

How are you planning to make and fasten the corner?

My favorite method was the rebar - but if you go this route look for a heavy duty drill bit like a Nail Eater auger bit. Yes the $25 price tag looks high at first but it makes life MUCH easier.
 
Joined
Jul 26, 2020
Messages
32
Reaction score
12
Location
Mobile Alabama
Hardiness Zone
8b
Country
United States
Yup. Even on level ground every garden bed is built a little different.

So you're planning on stacking the 4x4s to make your height. How are you fastening them together? I have done this three different ways (1) use a heavy duty screw gun and shoot in lag bolts (new construction screws like SPAX or GRK are the same idea), (2) stack the 4x4 then drill through the stack with a 1/2" bit and pound in rebar - this also will allow you to anchor it deeper into the ground, (3) stack the 4x4 then drill through the stack with a 1" or so bit and pound in wooden broom sticks.

How are you planning to make and fasten the corner?

My favorite method was the rebar - but if you go this route look for a heavy duty drill bit like a Nail Eater auger bit. Yes the $25 price tag looks high at first but it makes life MUCH easier.
I initially planned on using 6 inch lag screws. After it was constructed I will drill holes and I will use 1/2 rebar. I will use the impact driver for the screws and the drill for the rebar.
If it was on level land it would be a piece of cake . I would like to see a video from start to finish or at the very least illustrations from start to finish

the fellow who had a landscape company said I would figure it out as I go. He said u don’t have to stack them. I could just place one 4x4x8 and secure it. Build up the low side and stagger the side pieces. Which sounds like I would get the 8ft length on the low side level. Each 4x4 are screwed to each one and than drill holes and pound the rebar in. After that somehow stagger the sides.

my idea means more wood below the surface. Which is probably not the best idea.

if you know a better way please advise. Thanks
 
Ad

Advertisements

Joined
Oct 8, 2017
Messages
6,269
Reaction score
4,726
Location
Birmingham, AL USA
Hardiness Zone
8a
Country
United States
I use a long spiral galvanised nail called a spike for garden timbers and yard 4x4. They go right in with a hammer. Some are quite large.
71NR7_VWvIL._SL1500_ef5a60dc-d0f5-4f6b-bdb1-a2a1fae0e2d1_1376x1376.jpg
 
Joined
Jul 26, 2020
Messages
32
Reaction score
12
Location
Mobile Alabama
Hardiness Zone
8b
Country
United States
the spikes, the nails, and the rebar I am good to go. It is just dealing with the slope & how I should construct it.
 
Joined
Jul 26, 2020
Messages
32
Reaction score
12
Location
Mobile Alabama
Hardiness Zone
8b
Country
United States
I initially planned on using 6 inch lag screws. After it was constructed I will drill holes and I will use 1/2 rebar. I will use the impact driver for the screws and the drill for the rebar.
If it was on level land it would be a piece of cake . I would like to see a video from start to finish or at the very least illustrations from start to finish

the fellow who had a landscape company said I would figure it out as I go. He said u don’t have to stack them. I could just place one 4x4x8 and secure it. Build up the low side and stagger the side pieces. Which sounds like I would get the 8ft length on the low side level. Each 4x4 are screwed to each one and than drill holes and pound the rebar in. After that somehow stagger the sides.

my idea means more wood below the surface. Which is probably not the best idea.

if you know a better way please advise. Thanks
I was planning on connecting the corners like this: https://www.lowes.com/n/how-to/how-to-build-a-terraced-garden-bed
 
Joined
Oct 8, 2017
Messages
6,269
Reaction score
4,726
Location
Birmingham, AL USA
Hardiness Zone
8a
Country
United States
I like these for trenching. Its called a mattock.
54a0306_germanmattock_webalt.jpg

Some have a pick instead of an axe. I have both. You said no rocks so the axe is good for roots.

You may also want a sharp shooter or trenching shovel:
 
Joined
Jul 26, 2020
Messages
32
Reaction score
12
Location
Mobile Alabama
Hardiness Zone
8b
Country
United States
I like these for trenching. Its called a mattock. View attachment 69953
Some have a pick instead of an axe. I have both. You said no rocks so the axe is good for roots.

You may also want a sharp shooter or trenching shovel:
This is one of those areas that have few if any roots as well. That end opposite of the axe looks like it would
be really good for digging out for the 4x4
 
Ad

Advertisements

Joined
Oct 8, 2017
Messages
6,269
Reaction score
4,726
Location
Birmingham, AL USA
Hardiness Zone
8a
Country
United States
This is one of those areas that have few if any roots as well. That end opposite of the axe looks like it would
be really good for digging out for the 4x4
Exactly. No more than necessary, enough mass to hit it hard for your lifting. No swinging down, just lift the tool. Its not a hoe.
 
Joined
Jul 26, 2020
Messages
32
Reaction score
12
Location
Mobile Alabama
Hardiness Zone
8b
Country
United States
This is what I am shooting for, less maybe one or two layers.
If I could find a step by step illustration or better yet video on building this it would be great
 

Attachments

  • pic of 4x4x8 raised garden bed on a slope.jpg
    pic of 4x4x8 raised garden bed on a slope.jpg
    222.1 KB · Views: 355
Joined
Jul 3, 2020
Messages
292
Reaction score
170
Location
Western Michigan
Hardiness Zone
6B
Country
United States
Go for it and get started. You can only learn so much when watching and reading about a topic. That is why any engineering class worth taking is lab based.

Set the first 8' length where you want it and level it out as you like it.

Measure the side return by using your 4' bubble stick and make it level between the top of that 8' face and your slope. Measure that length, cut, install that return. Do the same on the other side but remember it will be next to the 8' face and will show the end grain so add that amount to the cut length.

Rinse and repeat.

Place in the rebar every two or three rows as you see needed. Maybe put crayon marks on the inside (soil side) where you put the rebars so you don't try drilling into one when installing a few rows above it.
 
Ad

Advertisements

Joined
Jul 26, 2020
Messages
32
Reaction score
12
Location
Mobile Alabama
Hardiness Zone
8b
Country
United States
Go for it and get started. You can only learn so much when watching and reading about a topic. That is why any engineering class worth taking is lab based.

Set the first 8' length where you want it and level it out as you like it.

Measure the side return by using your 4' bubble stick and make it level between the top of that 8' face and your slope. Measure that length, cut, install that return. Do the same on the other side but remember it will be next to the 8' face and will show the end grain so add that amount to the cut length.

Rinse and repeat.

Place in the rebar every two or three rows as you see needed. Maybe put crayon marks on the inside (soil side) where you put the rebars so you don't try drilling into one when installing a few rows above it.
Measure the side return by using your 4' bubble stick and make it level between the top of that 8' face and your slope. Measure that length, cut, install that return. Do the same on the other side but remember it will be next to the 8' face and will show the end grain so add that amount to the cut length. This is where I seem
Learn to use a plumb bob. Your analysis paralysis is not mentally healthy.
So are you saying that I am trying to think this out to much?

Not sure how the plumb bob would help. I realize it is for vertical, but isn't that designed for where you might be building a wall.

I cannot do anything until I see where the chance of rain goes down. I need 2 days for it to be dry. That I am certain of.
 
Joined
Oct 8, 2017
Messages
6,269
Reaction score
4,726
Location
Birmingham, AL USA
Hardiness Zone
8a
Country
United States
Plumb bobs are exactly useful for walls, corners especially. The secret is to be off the real wall by a known amount, say 2 inches, or 6, top and bottom.
 
Ad

Advertisements

Joined
Jul 3, 2020
Messages
292
Reaction score
170
Location
Western Michigan
Hardiness Zone
6B
Country
United States
Start building and think each step through. Expect the first garden bed to take all day. The worst that will happen is you have to rebuild it. Don't worry about it. Learn from doing.

Projects can smell fear. Don't let it win.

Just start and build it, you'll be fine.
 
Ad

Advertisements


Ask a Question

Want to reply to this thread or ask your own question?

You'll need to choose a username for the site, which only take a couple of moments. After that, you can post your question and our members will help you out.

Ask a Question

Top